Here's a neat graph from Google for the worldwide interest for the search term "3d autostereoscopic" from 2004-to-present:
Thursday, November 12, 2009
Monday, November 9, 2009
New Autostereoscopic (A3D) Videos
The fact is, that you cannot truly experience an autostereoscopic "no-glasses" video unless you are viewing it on an autostereoscopic monitor. So, it's really hard to sell an A3D video when just showing the video as 2D. That being said, here are 3 recently produced A3D videos (in 2D of course!) made by me for APCO AudioVisual. If you were viewing these videos on an A3D monitor, the objects would truly look as if they are floating in front of the monitor!
Tuesday, July 14, 2009
Brief 9-View Multiview Autosterescopic Video Frames Summary
 How does it work? is a question I hear often. Here's a brief answer: Normal 2D video is usually 30 frames per second. That means for each second of video, you actually see 30 still pictures in a row, each displayed for 1/30th of a second.
For an autostereoscopic video, each frame consists of 9 different pictures, each picture from a slightly different viewing angle. So, for each second of an autostereoscopic video, you have 270 pictures.
For each frame, each of the 9 pictures is rasterized into a single image according to the rule of the 3D lenticular overlay. When that rasterized image is displayed by the LCD monitor, through the lenticular overlay, it then appears as an autostereoscopic 3D image.
Visualizing the Viewing Planes of a "Glasses-Free" Autostereoscopic 3D Monitor.
One of the questions I'm often asked is "why aren't these monitors in movie theaters yet?" The answer to this question is that, although crowds of people can simultaneously view the same monitor and see the 3D effect, there are some spots where the image becomes blurry.
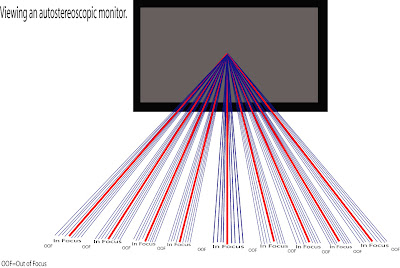
Imagine that there are 9 lines coming out of the 3D display, all from a point in the center of the display, spreading out horizontally. These 9 lines are the viewing planes. When your head is within a range close to the viewing planes, you are in the "sweet spot" and can see the 3D effect perfectly in focus. However, if you move your head horizontally, when it is near the middle of two adjacent viewing planes, the 3D image becomes a little blurry, until you're head once again is close to a viewing plane.
In the image below, the viewing planes are the red lines. If your eyes are both within the range of the blue lines that surround the red lines (viewing planes) you can see the 3D effect. If your eyes are not both within the blue lines, the image becomes slightly blurry.

Tuesday, June 30, 2009
Philips Wowvx Website is Officially Down.
It's official. The Philips Wowvx website is now officially down, the page now redirects to Philips 3D solutions website.
http://www.wowvx.com/
If you have Wowvx content, have no fear!
My company can convert it to the new MultiView (9-view) format to be played back on our autostereoscopic screens. Actually, we can convert your WOWvx videos into ANY stereoscopic or autostereoscopic format for many different 3d screens.
http://www.apcoav.com/ for more info.
Good thing I backed up their wowvx blog for future reference.
Monday, June 29, 2009
How To Make a 2D+Depth (Wowvx) Frame
In this tutorial we will make a simple 2D+Depth (formerly known as Wowvx) frame.
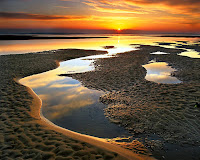

A 2D+Depth image is simply a picture with two frames side by side, the left one being the original picture, the right one being the depth map.

The picture above is our original. It is a 600x479 .jpg. This is an arbitrary picture I found off the web.
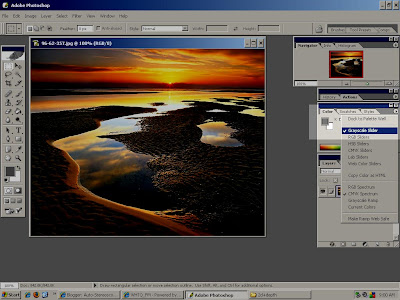
We open the picture in Photoshop, "Save As", and name it something - this will be our depth map.
First, we want to set the document colors to grayscale. Click on the little arrow in the cirle by the "color" tab (screen01) and change the colors to grayscale.

When you create a depth map, it is basically a picture that is only composed of grayscale colors, black being the furthest away, and white being the closest.
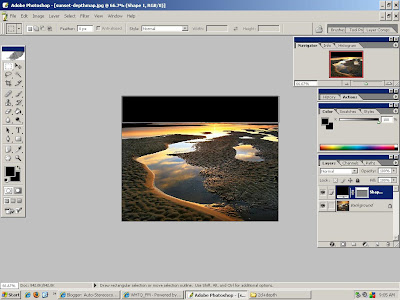
Since everything over the horizon in this picture is farthest away, we will make it all black. Change the color on the grayscale color to black, then create a black rectangle over the horizon.
It should now look like this (screen02):

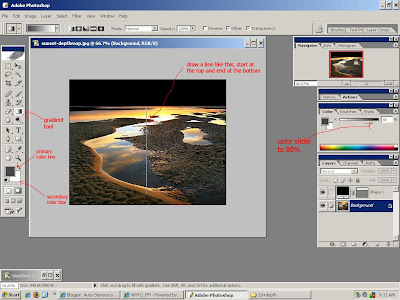
The beach is pretty much a continuous gradient from far to near, so over the beach we will create a rectangle, with the top being a dark gray, and we will have that gradient to white at the bottom of the rectangle.
Make sure you are on the layer that has the original picture, then use the gradient tool. You want to change the primary color box to a dark gray (I used 80%), and you want the secondary color box to be white. (screen03)

Note: If you can't find the gradient tool, click on the "Paint Bucket" tool and you will see it there.
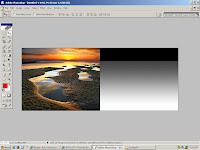
You're picture should now look like this (screen05):

That will be our depth map for the sunset picture. What it is saying is that the black area (over the horizon) is the farthest away, and the beach at it farthest is dark gray - which is a little closer than the sky, and then the beach gradually gets closer until you get to the bottom of the screen where it is white (closest).
But wait! We aren't done. Now we look at the dimensions of the original picture. It is 600x479. Since our final picture will include the original and the depth map, side by side, we will set its dimensions to 1200x479, so create a new picture and set the dimensions to that. Then paste in both the original picture and the depth map and you will have a picture that looks like this (screen06):

Congratulations! This is a 2D+depth (wowvx) frame which can now be displayed on an autostereoscopic monitor!
Thursday, June 25, 2009
How to Create an Alpha Channel.
When working with autostereoscopic media and 3d compositing, you often work with images that already have an alpha channel, or they need one. Here's a quick tutorial on how to turn a bitmap picture of your object of interest into one with an alpha channel.
Simply stated, an alpha channel is a picture consisting of either black or white pixels: wherever there is black - you will be able to see through the image, wherever there is white, you will see the original picture.
First, you must have an original image to work with (for this example, your original image does not already have an alpha channel).

This is the picture we will be working with. We will only deal with the reciever, not the microphones, in the picture. Our goal is to create a picture of the reciever which includes an alpha channel.
Open the original picture in Photoshop. In the dialog that show you the "Layers" of the picture, you will now only have one layer. Make sure that layer is active, then click "Ctrl-A" (select all), then "Ctrl-C" (copy). Click on the tab next to "Layers" which is called "Channels". Then click on the icon below which says "Create New Channel" when you hover your mouse over it. This will create an alpha channel, in addition to your RGB channels. Click on the alpha channel to make it active, then "Ctrl-V" (paste) the copy of our image into the alpha channel. [Screen-01]
Since we only want the reciever, and not the microphones, let's crop the picture, so you'll end up with something like this: [Screen-02]
Now we have the picture cropped, and we have created an alpha channel that , as of now, has a copy of the reciever in it. What we want to do is to turn that copy of the receiver that's in the alpha channel into a black and white image. The receiver should be white and the background should be black.
Let's hide the RGB channels and just work on the alpha channel for now. [Screen-03]
Use the magic wand tool and click somewhere in the background so that it becomes highlighted. Then using the Paint Bucket tool, fill in the background with the color black. Under "Select", choose "Inverse" (Shift-Ctrl-I) to invert the selection so that now the receiver is selected. Using the Paint bucket tool again, lets make the receiver all white. this can be done by clicking on the receiver repeatedly until the whole thing is white. It'll now look like this: [Screen-04]
Now click on the "RGB" channel so that all the RGB channels are now visible, keeping the alpha channel visible and it will now look like this: [Screen-05]
You are done! You have just turned that boring bitmap picture of a receiver into a fun picture of a receiver that includes an alpha channel.
The only other thing you have to do is save the picture in a format that keeps the alpha channel. I always save it to .TGA.
To save as a .TGA, go to "File"-->"Save As". Choose .tga as file type, under the options dialog, choose "32 bits/pixel".
And voila!
Note: If you plan on going back and editing the alpha channel directly, use the .tga filke type. When you save as .png, you loose the separate alpha channel.
Download all the files associated with this tutorial in a .zip file here.
Simply stated, an alpha channel is a picture consisting of either black or white pixels: wherever there is black - you will be able to see through the image, wherever there is white, you will see the original picture.
First, you must have an original image to work with (for this example, your original image does not already have an alpha channel).
This is the picture we will be working with. We will only deal with the reciever, not the microphones, in the picture. Our goal is to create a picture of the reciever which includes an alpha channel.
Open the original picture in Photoshop. In the dialog that show you the "Layers" of the picture, you will now only have one layer. Make sure that layer is active, then click "Ctrl-A" (select all), then "Ctrl-C" (copy). Click on the tab next to "Layers" which is called "Channels". Then click on the icon below which says "Create New Channel" when you hover your mouse over it. This will create an alpha channel, in addition to your RGB channels. Click on the alpha channel to make it active, then "Ctrl-V" (paste) the copy of our image into the alpha channel. [Screen-01]
Since we only want the reciever, and not the microphones, let's crop the picture, so you'll end up with something like this: [Screen-02]
Now we have the picture cropped, and we have created an alpha channel that , as of now, has a copy of the reciever in it. What we want to do is to turn that copy of the receiver that's in the alpha channel into a black and white image. The receiver should be white and the background should be black.
Let's hide the RGB channels and just work on the alpha channel for now. [Screen-03]
Use the magic wand tool and click somewhere in the background so that it becomes highlighted. Then using the Paint Bucket tool, fill in the background with the color black. Under "Select", choose "Inverse" (Shift-Ctrl-I) to invert the selection so that now the receiver is selected. Using the Paint bucket tool again, lets make the receiver all white. this can be done by clicking on the receiver repeatedly until the whole thing is white. It'll now look like this: [Screen-04]
Now click on the "RGB" channel so that all the RGB channels are now visible, keeping the alpha channel visible and it will now look like this: [Screen-05]
You are done! You have just turned that boring bitmap picture of a receiver into a fun picture of a receiver that includes an alpha channel.
The only other thing you have to do is save the picture in a format that keeps the alpha channel. I always save it to .TGA.
To save as a .TGA, go to "File"-->"Save As". Choose .tga as file type, under the options dialog, choose "32 bits/pixel".
And voila!
Note: If you plan on going back and editing the alpha channel directly, use the .tga filke type. When you save as .png, you loose the separate alpha channel.
Download all the files associated with this tutorial in a .zip file here.
Tuesday, June 23, 2009
3D Technology Means New Rules for Directors.
[WORK IN PROGRESS]
[by BH]
[LAST UPDATE: 06-23-2009]
When you visualize a scene for a traditional 2D Video, you can use storyboards(*1) and apply unlimited creative use of cameras, lighting, framing the shot and more.
When you visualize a scene for a 3D movie, the enitre process changes.
Their are 4 different types of 3D movies - each of which is unique and must be handled differently in terms of creative visualization. Here are my personal classifications:
1. A 2D movie which is created from a 3D environment. This applies to CG animated movies such as Wall-E, Shrek or Finding Nemo. Many times, people will call these movies 3D, but in fact they are only 2D exports from 3d environments.
2. A 2D IMAX movie created from a 3D environment. These are very similar to #1, but when placing the scene's assets on the x,y,z plane, you have more spatial, peripheral freedom.
3. An autostereoscopic 3D movie. This type of 3D is characterized by having a limited amount of depth to work with during the creative process.
4. A stereoscopic 3D movie. You need 3D glasses for this kind. Anaglyph are the red-green glasses; polarized are tinted and are the kind you would find at Disney or Universal. You have almost unlimited use of depth in this type of 3D.
****************************************************************
Here is an article that talks about the new rules for directors when it comes to 3d video production. This article inspired my article:
http://news.cnet.com/8301-19882_3-10266869-250.html?tag=newsLeadStoriesArea.1
********************************************************************************
(*1) I created a template to help in the storyboard/visualization process of autostereoscopic videos. download .gif here
Friday, June 19, 2009
3D Article - No-Glasses 3D Display
Here's a new article about 3D Displays out of England:
http://www.laptopshop.co.uk/news/2009/06/you-dont-need-geeky-glasses-to-watch-3d/
The language they use to describe the technology is vague, but wotrth a read.
http://www.laptopshop.co.uk/news/2009/06/you-dont-need-geeky-glasses-to-watch-3d/
The language they use to describe the technology is vague, but wotrth a read.
Subscribe to:
Posts (Atom)